Appendix A — Laboratory Experiments
This section contains the laboratory experiments designed to accompany the textbook chapters. Experiments 1–3 cover fundamental techniques introduced alongside Chapter 1 (the mole concept). Experiments 4–6 correspond to Chapters 2 and 3 (halogens, sulfur and sulfuric acid). Experiments 7–9 correspond to Chapters 4 and 5 (alkali metals, atomic structure and periodic law). An optional experiment on measuring Avogadro’s constant is included at the end.
A.1 Experiment 1: Basic Laboratory Operations
I. Using a Pan Balance
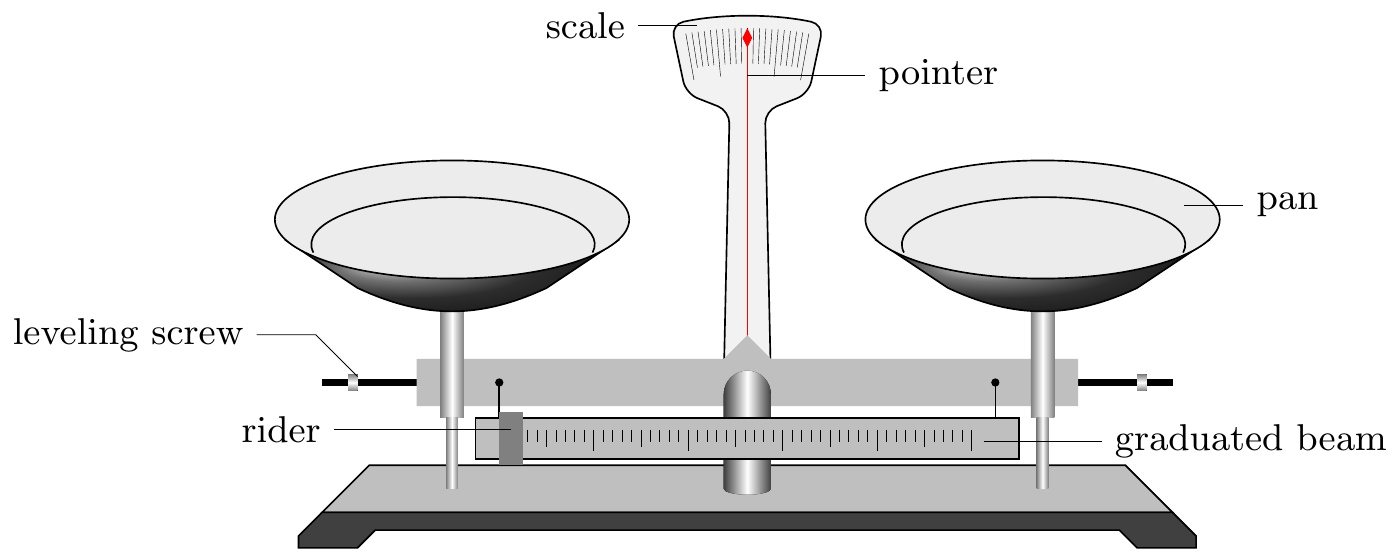
A pan balance (Figure A.1) is a commonly used weighing instrument for measurements that do not require high precision, generally accurate to \(0.1\ \text{g}\) (some models to \(0.2\ \text{g}\)). The method of using a pan balance was introduced in the “Basic Laboratory Operations” section of the junior high school chemistry textbook.
Student Practice
Weigh a small beaker. Should the beaker be placed on the left pan or the right pan of the balance? Why?
Weigh out \(2\ \text{g}\) of table salt. Place a sheet of paper on each pan of the balance — why? Note: when only a small amount of salt remains to be added, hold the spatula in your left hand and gently tap your left wrist with your right hand to carefully vibrate the spatula and add the remaining amount.
II. Using a Volumetric Flask
A volumetric flask is an instrument used to prepare solutions of precise concentration. It is a narrow-necked, pear-shaped flat-bottomed glass flask (Figure A.2). The flask mouth is fitted with a ground-glass or plastic stopper. Its neck is etched with a calibration mark, and the flask is labeled with its temperature rating and volume. Common volumetric flask sizes include 50, 100, and \(250\ \text{mL}\).

How to Use a Volumetric Flask
Check for leaks before use. Add water to the flask, insert the stopper, hold the flask with one hand and press the stopper with the other, then invert the flask. Observe whether water leaks around the stopper. If no leak occurs, rotate the stopper \(180{}^{\circ}\), re-insert it, and invert the flask again to check. Only a flask that passes both leak tests may be used.
Prepare the solution.
If the sample is a solid, dissolve the weighed sample in a beaker. If the sample is a liquid, measure it with a graduated cylinder and pour it into a beaker. Then add a small amount of distilled water and stir with a glass rod to mix uniformly.
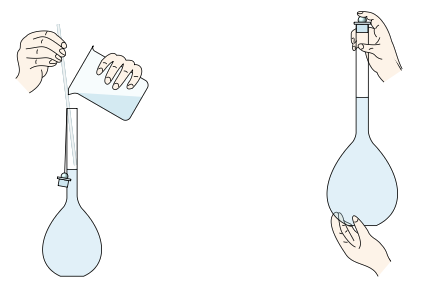
Transfer the solution from the beaker into the volumetric flask (Figure A.3) and rinse the beaker multiple times, transferring all rinse water into the volumetric flask to ensure complete transfer of the solute. Slowly add distilled water until the liquid level is \(2\)–\(3\ \text{cm}\) below the calibration mark, then use a dropper to add water drop by drop to the mark. (Operate carefully — do not exceed the mark.)
Insert the stopper, press it with your index finger, and support the bottom of the flask with the fingers of your other hand (Figure A.3, right panel). Invert and shake the flask repeatedly to mix the solution uniformly.
Student Practice
Practice using a volumetric flask (you may use water in place of an actual solution).
III. Extraction and Liquid–Liquid Separation
Extraction. The process of using a solvent to remove a solute from another solution in which the solute has a different solubility (with the two solvents being immiscible) is called extraction.1 Extraction is widely used in industrial production and scientific research.
Liquid–liquid separation. Separating two immiscible liquids is called liquid–liquid separation (also known as separatory funnel separation). The instrument used is a separatory funnel. Separatory funnels come in cylindrical, spherical, and conical shapes (Figure A.4), with common volumes of 50, 100, and \(250\ \text{mL}\). Extraction and separation can sometimes be performed together.

Procedure (combined extraction and separation).
Add the extraction solvent to the solution. Hold the separatory funnel with your right hand pressing on the mouth and your left hand gripping the stopcock, invert the funnel, and shake vigorously (Figure A.5 (a)).
Place the separatory funnel on a ring stand (Figure A.5 (b)) and allow it to stand briefly.
Open the glass stopper on the separatory funnel, or align the groove or small hole on the stopper with the small hole on the funnel mouth, so that the air inside and outside the funnel are connected — this ensures the liquid can flow out.
Open the stopcock and allow the lower layer of liquid to flow out slowly.


Student Practice
Using a graduated cylinder, measure \(10\ \text{mL}\) of a saturated aqueous iodine solution and pour it into a separatory funnel. Then add \(3\ \text{mL}\) of carbon tetrachloride (\(\ce{CCl4}\)). After shaking and allowing the mixture to stand, the solution separates into two layers: the upper layer is the aqueous layer and the lower layer is the carbon tetrachloride layer. Open the stopcock and collect the lower layer in a small beaker, then transfer it to a designated container for recovery.
A.2 Experiment 2: Preparing Solutions of Known Molar Concentration
Purpose
- Learn the basic method for preparing solutions of known molar concentration.
- Learn to use a volumetric flask and to weigh corrosive reagents.
Materials
Pan balance and masses, beaker, graduated cylinder, glass rod, \(250\ \text{mL}\) volumetric flask, rubber-tipped dropper, spatula. Concentrated hydrochloric acid (density \(1.19\ \text{g/cm}^3\), mass fraction \(37.5\%\)), sodium hydroxide.
Procedure
Prepare \(250\ \text{mL}\) of \(1\ \text{M}\) hydrochloric acid.2
Calculate the amount of solute. Using the density of concentrated hydrochloric acid (\(1.19\ \text{g/cm}^3\)) and its mass fraction of \(37.5\%\), calculate the volume of concentrated hydrochloric acid needed to prepare \(250\ \text{mL}\) of \(1\ \text{M}\) \(\ce{HCl}\).
Measure the concentrated hydrochloric acid. Using a graduated cylinder, measure the required volume of concentrated hydrochloric acid and pour it into a beaker. Add a small amount of water (approximately \(50\ \text{mL}\)) and stir slowly with a glass rod to mix uniformly. Allow to cool.
Prepare the solution. Pour the diluted hydrochloric acid along a glass rod into the volumetric flask. Rinse the beaker twice with \(30\ \text{mL}\) portions of water, pouring the rinse water into the volumetric flask as well. Shake to mix uniformly, then continue carefully adding water until the liquid level is \(2\)–\(3\ \text{cm}\) below the calibration mark. Use a rubber-tipped dropper to add water to the mark. Cap the flask tightly and shake to mix. The resulting solution is \(1\ \text{M}\) hydrochloric acid.
Prepare \(250\ \text{mL}\) of \(1.1\ \text{M}\) sodium hydroxide solution.
Calculate the amount of solute. Calculate the mass of \(\ce{NaOH}\) needed to prepare \(250\ \text{mL}\) of \(1.1\ \text{M}\) sodium hydroxide solution.
Weigh the sodium hydroxide. Using a pan balance, first weigh a clean, dry beaker. Then place the sodium hydroxide into the beaker and weigh the total. Subtract the beaker mass to obtain the mass of sodium hydroxide.
Prepare the solution. Add \(50\ \text{mL}\) of water to the beaker and stir with a glass rod to dissolve. Allow to cool, then follow the same procedure used for the hydrochloric acid to prepare \(250\ \text{mL}\) of \(1.1\ \text{M}\) sodium hydroxide solution.
Pour the prepared solutions into the designated containers.
Discussion
After transferring the solution from the beaker to the volumetric flask, why must the beaker be rinsed and the rinse water also poured into the volumetric flask?
A.3 Experiment 3: Purifying Copper Sulfate by Recrystallization; Measuring the Water of Crystallization Content
Purpose
- Learn the recrystallization method for purifying crystals.
- Learn the method for measuring the water of crystallization content in a crystal.
- Develop basic skills in ignition and heating to constant mass.
Materials
Pan balance and masses, beaker, funnel, filter paper, graduated cylinder, glass rod, ring stand, wire gauze, watch glass, porcelain crucible, crucible tongs, desiccator, alcohol lamp.
Copper sulfate crystals (\(\ce{CuSO4 * 5H2O}\)).
Procedure
1. Purifying Copper Sulfate Crystals by Recrystallization
To obtain crystals of higher purity, dissolve the crystallized product in distilled water again, heat to form a saturated solution, then cool to allow recrystallization. The impurities remain in the mother liquor. This process is called recrystallization.
Weigh and dissolve. Using a pan balance, weigh \(5\ \text{g}\) of crude copper sulfate crystals and place them in a clean small beaker. Using a graduated cylinder, measure \(10\ \text{mL}\) of distilled water, pour it into the beaker, and heat until the copper sulfate is completely dissolved.
Filter. While still hot, pour the solution into a pre-assembled filter funnel. Collect the filtrate in a small beaker.
Evaporate. Place the beaker on a wire gauze and heat to evaporate approximately one-third of the solution volume.
Crystallize. Immerse the beaker in cold water. Copper sulfate crystals will precipitate from the solution.
Dry. Carefully pour off the mother liquor from the beaker (recover it). Place the crystals on a watch glass, use filter paper to absorb surface water from the crystals, then transfer the crystals onto two layers of filter paper. Spread them with a glass rod, cover with another sheet of filter paper, and gently press with your fingers to absorb surface water. Replace the filter paper and repeat once or twice until the crystals are dry.
2. Measuring the Water of Crystallization Content in Copper Sulfate Crystals
Weigh. Accurately weigh a dry porcelain crucible, then use the same crucible to weigh \(2\ \text{g}\) of the copper sulfate crystals you prepared.
Heat. Place the crucible containing the copper sulfate crystals on a wire gauze and heat slowly with an alcohol lamp until the blue color of the crystals has completely turned white and no more water vapor is evolved. Then place the crucible in a desiccator to cool.
Weigh. After the crucible has cooled in the desiccator, weigh it on the balance. Record the combined mass of the crucible and anhydrous copper sulfate.
Reheat and reweigh to constant mass. Heat the crucible containing the anhydrous copper sulfate again, cool in the desiccator, and reweigh. Repeat until the difference between two consecutive weighings does not exceed \(0.1\ \text{g}\).
Calculate. Based on the experimental results, calculate the number of moles of water of crystallization per mole of copper sulfate using the following formula:
\[ \frac{W_{\ce{CuSO4}}}{M_{\ce{CuSO4}}} : \frac{W_{\ce{H2O}}}{M_{\ce{H2O}}} = 1 : x \]
where:
- \(x\) = the number of moles of water of crystallization per mole of copper sulfate
- \(W_{\ce{CuSO4}}\) = mass of anhydrous copper sulfate after heating (g)
- \(M_{\ce{CuSO4}}\) = molar mass of copper sulfate (g/mol)
- \(W_{\ce{H2O}}\) = mass of water of crystallization in the crystal (g)
- \(M_{\ce{H2O}}\) = molar mass of water (g/mol)
Discussion
When purifying copper sulfate crystals by recrystallization, why should the filtrate not be evaporated to dryness during the evaporation step?
A.4 Experiment 4: Properties of Chlorine, Bromine, and Iodine
Purpose
- Study the reactions of chlorine, bromine, iodine, and halide ions.
- Practice the techniques of extraction and liquid–liquid separation.
- Observe displacement reactions among the halogens.
Materials
Test tubes, rubber-tipped dropper, separatory funnel, beaker, watch glass, alcohol lamp, ring stand.
Sodium chloride, sodium bromide, potassium iodide, chlorine water, bromine water, iodine water, starch solution, iodine, carbon tetrachloride (\(\ce{CCl4}\)), potassium iodide–starch test paper, silver nitrate solution, dilute nitric acid.
Procedure
Observe the color of chlorine water. Open the cap of the chlorine water bottle. Carefully smell the chlorine gas using the proper wafting technique.
Reaction of iodine with starch. Add starch solution to each of two test tubes. To one test tube, add 2–3 drops of iodine water; to the other, add 2–3 drops of potassium iodide solution. What phenomena are observed? Explain your observations.
Sublimation of iodine. Place a few iodine crystals in a dry small beaker. Cover it with a watch glass containing a small amount of cold water, then heat gently (Figure A.6). Observe the changes in the iodine crystals upon heating. Explain the phenomena observed. Recover the iodine that condenses on the bottom of the watch glass.

Extraction.
Add one drop of bromine water to a test tube, then add 5 drops of carbon tetrachloride. Shake the test tube and observe the color change in the carbon tetrachloride layer.
Using a graduated cylinder, measure \(10\ \text{mL}\) of iodine water and test it with potassium iodide–starch paper. Pour the iodine water into a separatory funnel, then add \(3\ \text{mL}\) of carbon tetrachloride. Shake, allow to settle, then separate. Collect the carbon tetrachloride layer in a small beaker and transfer it to a designated container for recovery. Use potassium iodide–starch paper to test the aqueous layer after extraction, and compare with the iodine water before extraction.3
Displacement reactions among chlorine, bromine, and iodine.
Mix a small amount of potassium iodide solution with starch solution and divide into two test tubes. Add chlorine water to one and bromine water to the other. What phenomena occur? Explain, and write the chemical equations for the reactions.
Add sodium bromide solution to each of two test tubes. Then add chlorine water to one and iodine water to the other. What phenomena occur? Explain, and write the chemical equations for the relevant reactions.
Reactions of halides with silver nitrate. Take three test tubes and add small amounts of sodium chloride solution, sodium bromide solution, and potassium iodide solution, respectively. Add 2–3 drops of silver nitrate solution to each. Then add a small amount of dilute nitric acid to each. Observe the phenomena, explain your observations, and write the chemical equations for the reactions.
Discussion
Potassium iodide–starch paper is commonly used to test for chlorine gas. Can this test paper be used to test for chlorine in sodium chloride or potassium chloride? Why or why not?
A.5 Experiment 5: Properties of Sulfuric Acid; Testing for Sulfate Ion
Purpose
- Learn the laboratory method for preparing sulfur dioxide.
- Study the characteristic properties of sulfuric acid.
- Learn how to test for the sulfate ion.
Materials
Round-bottom flask, single-hole rubber stopper, delivery tube, cotton, water trough, test tubes, glass rod, alcohol lamp, glass plate.
Sodium sulfite (\(\ce{Na2SO3}\)), fuchsin (magenta) solution, blue litmus paper, concentrated sulfuric acid, hydrochloric acid, barium chloride solution, sodium sulfate solution, sodium carbonate solution, copper strips.
Procedure
1. Preparation and Properties of Sulfur Dioxide
Assemble the apparatus as shown in Figure A.7. Check its gas-tightness.
Place a small amount of sodium sulfite in the round-bottom flask and add a small amount of concentrated sulfuric acid. Immediately seal the flask with the stopper fitted with a delivery tube. Insert the other end of the delivery tube into a dry test tube with a small wad of cotton plugging the mouth. After a moment, withdraw the delivery tube and insert it into a test tube containing fuchsin (magenta) solution. Observe the phenomena and write the chemical equation for the preparation of sulfur dioxide:
\[ \ce{Na2SO3 + H2SO4 -> Na2SO4 + H2O + SO2}{\uparrow} \]


- Cover the test tube filled with \(\ce{SO2}\) with your thumb, invert it in a water trough (Figure A.8), then remove your thumb. Observe what happens. After the water stops rising, cover the mouth again while underwater, remove the tube, hold it upright, and test with blue litmus paper. Explain the observed phenomena.
2. Characteristic Properties of Concentrated Sulfuric Acid
Dilution of concentrated sulfuric acid. Take a test tube and add approximately \(5\ \text{mL}\) of distilled water. Then carefully add approximately \(1\ \text{mL}\) of concentrated sulfuric acid along the wall of the test tube. Gently shake and touch the outside of the test tube with your hand. What do you observe? Save this dilute solution for the following experiments.
Action of concentrated sulfuric acid on paper. Using a glass rod, write characters on paper (placed over a glass plate) with concentrated sulfuric acid. Observe the changes in the writing. Why does this happen?
Place a small copper strip in a test tube and add \(3\ \text{mL}\) of the dilute sulfuric acid prepared in step (1). Is there any reaction? Heat briefly over an alcohol lamp — does any reaction occur? Why?
Place a small copper strip in another test tube and add \(2\ \text{mL}\) of concentrated sulfuric acid. Heat carefully over an alcohol lamp (ensure the test tube mouth is not pointed at anyone). Test the gas produced at the mouth of the test tube with moist blue litmus paper (being careful not to touch the tube mouth). What phenomena are observed? After a while, stop heating. Once the liquid in the test tube has cooled, carefully pour it along the wall into another test tube containing \(5\ \text{mL}\) of water. Observe the color of the solution.
3. Testing for Sulfate Ion
To a test tube containing dilute sulfuric acid solution, add a few drops of barium chloride solution. What happens? Then add a small amount of hydrochloric acid. Does anything change?
In two test tubes, add small amounts of sodium sulfate solution and sodium carbonate solution, respectively. Add a few drops of barium chloride solution to each. Carefully observe the phenomena. Then add a small amount of hydrochloric acid to each tube and observe further. Explain these phenomena.
Write the chemical equations for these reactions.
A.6 Experiment 6: Laboratory Exercises — Set 1
Purpose
- Reinforce the knowledge and experimental skills learned in the preceding chapters.
- Review methods for identifying nonmetal ions and acid-radical ions.
Problems
How would you use a chemical method to remove the scale (水垢) inside a thermos?
Use experiments to prove that hydrochloric acid contains two elements: hydrogen and chlorine.
Three sets of colorless solutions are given. How would you experimentally identify each?
Ammonium sulfate solution and ammonium chloride solution
Sodium sulfate solution and sodium sulfite solution
Dilute sulfuric acid and dilute hydrochloric acid
Pour bromine water into a test tube to fill it about one-third, then add some zinc powder. Stir with a glass rod and heat gently (if the solution has not decolorized, add more zinc powder) until the solution becomes colorless. Divide this solution between two test tubes: add chlorine water to one and silver nitrate solution to the other. Observe the phenomena and explain your observations.4
Without using any additional reagents, identify the following two sets of solutions:
\(\ce{HCl}\), \(\ce{CaCl2}\), \(\ce{Na2CO3}\)
\(\ce{NaBr}\), \(\ce{AgNO3}\), \(\ce{HCl}\), \(\ce{Na2CO3}\)5
A.7 Experiment 7: Properties of Alkali Metals and Their Compounds
Purpose
- Reinforce understanding of the properties of alkali metals and their compounds.
- Learn the method for extracting potassium salts from plant ash.
- Learn to use flame tests to identify alkali metal ions.
Materials
Beaker, test tubes, tweezers, glass plate, small knife, aluminum foil, spatula, wooden splint, funnel, filter paper, alcohol lamp, glass rod, delivery tube, rubber stopper, ring stand (with clamp), blue cobalt glass, platinum wire (or clean, rust-free iron wire).
Sodium metal, sodium carbonate, sodium hydrogen carbonate, potassium carbonate, sodium peroxide, limewater, phenolphthalein indicator, plant ash, barium chloride solution, hydrochloric acid, silver nitrate solution, dilute nitric acid.
Procedure
1. Properties of Sodium Metal
Using tweezers, remove a small piece of sodium metal and wipe off the kerosene with filter paper. Place the sodium on a glass plate and cut off a mung-bean-sized piece with a small knife. Note the hardness of sodium and observe the luster of the freshly cut surface.
Pour some water into a small beaker beforehand. Then, using tweezers, place the cut piece of sodium into the beaker and quickly cover it with a glass plate. Observe the phenomena. Is sodium more dense or less dense than water?
Cut another small piece of sodium (mung-bean-sized) and wrap it in aluminum foil (pre-pierced with a few pinholes using a needle). Hold it with tweezers and place it at the mouth of a test tube in the apparatus shown in Figure A.9. When the test tube is full of gas, invert it near an alcohol lamp and ignite. What happens? What gas was produced in the reaction?

Add a few drops of phenolphthalein indicator to the beaker. What phenomenon occurs?
What chemical reaction does sodium undergo with water? Write the chemical equation.
2. Properties of Sodium Peroxide
Place a small spoonful of sodium peroxide (\(\ce{Na2O2}\)) into a dry test tube. Observe the color of the sodium peroxide. Add approximately \(3\ \text{mL}\) of water and test the gas produced with a glowing wooden splint. What substance is formed? Write the chemical equation.
3. Properties of Sodium Hydrogen Carbonate
Place sodium hydrogen carbonate (\(\ce{NaHCO3}\)) powder in a dry test tube, filling about 1/6 of the tube’s volume. Seal the tube mouth with a stopper fitted with a delivery tube and clamp the tube to a ring stand, tilting the mouth slightly downward (Figure A.10). Insert the end of the delivery tube into limewater.

Heat the sodium hydrogen carbonate. Observe the phenomena. What reaction occurs? Write the chemical equation.
When the bubbling has nearly stopped, first raise the test tube so that the delivery tube tip is above the limewater surface, remove the beaker of limewater, and then extinguish the alcohol lamp. Why must you follow this order of operations?
4. Extracting Potassium Salts from Plant Ash
Dissolve. Place an appropriate amount of plant ash6 in a beaker. Add water to \(1\)–\(2\ \text{cm}\) above the surface of the ash. Stir with a glass rod (gentle heating may be applied) to promote dissolution of the potassium salts.
Filter. Prepare a filter and filter the ash–water mixture. If the filtrate is cloudy, filter again until the filtrate is clear.
Evaporate. Pour the filtrate into an evaporating dish and set it up as shown in Figure A.11 for heating. Stir the liquid continuously with a glass rod to prevent spattering. When only a small amount of liquid remains, stop heating.

Cool. Allow to stand briefly. Potassium salt crystals will appear.
Test for carbonate, sulfate, and chloride ions.
Take a small amount of the crystals obtained, place them in a test tube, add distilled water to dissolve, and divide the solution into three portions in three test tubes:
- To the first test tube, add hydrochloric acid. Observe the phenomenon.
- To the second test tube, add barium chloride solution, then add hydrochloric acid. Observe the phenomenon.
- To the third test tube, add silver nitrate solution, then add dilute nitric acid. Observe the phenomenon.
Write the chemical equations for the reactions in step (5).
Based on these reactions, which ions can be confirmed in the solution?
5. Flame Tests
Prepare small amounts of sodium carbonate solution, potassium carbonate solution (or their powders), and a mixed solution (or mixed powder) of sodium and potassium carbonates. Heat a platinum wire7 until red-hot, then dip the wire in potassium carbonate solution (or powder) and hold it in the alcohol lamp flame. Observe the flame color through blue cobalt glass. What color does the flame show? Why?
Clean the platinum wire, then dip it successively in sodium carbonate solution (or powder) and the mixed sodium–potassium carbonate solution (or powder), and hold in the flame. For the mixed sample, first observe the flame color directly, then through blue cobalt glass. What colors are observed? Why?
Clean the platinum wire, dip it in your prepared potassium salt crystals, and hold it in the flame. Observe the flame color through blue cobalt glass.
Discussion
If sodium chloride contains sodium carbonate as an impurity, how would you test for and remove it?
A.8 Experiment 8: Periodic Trends in Same-Period and Same-Group Elements
Purpose
Reinforce understanding of the periodic trends in properties of elements within the same period and the same main group.
Materials
Test tubes, test tube clamp, alcohol lamp, beaker, sandpaper, spatula, glass plate.
Potassium, sodium, magnesium ribbon, aluminum sheet, sodium hydroxide solution, phenolphthalein indicator, magnesium chloride solution, aluminum chloride solution, hydrosulfuric acid (\(\ce{H2S}\) solution), chlorine water, bromine water, sodium chloride, sodium bromide, sodium iodide.
Procedure
1. Periodic Trends Within the Same Period
Take a \(100\ \text{mL}\) beaker and pour in approximately \(50\ \text{mL}\) of water. Take two test tubes and add approximately \(5\ \text{mL}\) of water to each. Cut a mung-bean-sized piece of sodium and place it in the beaker. Take a piece of magnesium ribbon, polish it with sandpaper to remove the oxide layer, and place it in one test tube. Take a piece of aluminum sheet, immerse it in sodium hydroxide solution to remove the oxide film, then rinse with water and place it in the other test tube. Observe the reaction phenomena carefully. If the reaction is slow, heat over an alcohol lamp.
Add 2–3 drops of phenolphthalein indicator to the beaker and both test tubes. Observe the phenomena.
Take two test tubes. Add \(3\ \text{mL}\) of magnesium chloride solution to one and \(3\ \text{mL}\) of aluminum chloride solution to the other. Then gradually add excess sodium hydroxide solution dropwise to each. Observe the phenomena.
Add approximately \(3\ \text{mL}\) of hydrosulfuric acid to a test tube, then add chlorine water dropwise. Observe the phenomena.
Based on these experiments, what conclusions can you draw?
2. Periodic Trends Within the Same Main Group
Add approximately \(50\ \text{mL}\) of water to a \(100\ \text{mL}\) beaker, then add a mung-bean-sized piece of potassium. Cover the beaker with a glass plate. Observe how vigorously the reaction proceeds and compare with the reaction of sodium with water in Procedure 1(1).
In three test tubes, add small amounts of sodium chloride, sodium bromide, and sodium iodide crystals, respectively, along with a small amount of distilled water to dissolve each. Then add \(1\ \text{mL}\) of chlorine water to each and observe the color changes.
Take three more test tubes and repeat the above experiment using bromine water instead of chlorine water.
Based on these three experiments, what conclusions can you draw?
Discussion
Within the same period, metallic character decreases from left to right while nonmetallic character increases. Within the same main group, metallic character increases from top to bottom while nonmetallic character decreases. How are these trends related to the atomic structure and electron configuration of the elements?
A.9 Experiment 9: Laboratory Exercises — Set 2
Purpose
- Reinforce the knowledge and experimental skills learned throughout this book.
- Review methods for identifying substances.
Problems
Using experimental methods, distinguish between sodium carbonate (\(\ce{Na2CO3}\)) and sodium hydrogen carbonate (\(\ce{NaHCO3}\)).
Sodium sulfate contains a small amount of iron(III) sulfate (\(\ce{Fe2(SO4)3}\)) as an impurity. How can you remove this impurity?
Using experimental methods, carry out the following sequence of transformations:
\[ \ce{Ca(OH)2 -> CaCO3 -> Ca(HCO3)2 -> CaCO3 -> CaCl2} \]
Use experiments to prove that potassium chlorate (\(\ce{KClO3}\)) contains potassium, oxygen, and chlorine — three elements.
Given four colorless solutions — \(\ce{NaCl}\), \(\ce{NaBr}\), \(\ce{NaI}\), and dilute \(\ce{HCl}\) — how would you experimentally identify each?
Without using any additional reagents, identify the following solutions:
\[ \ce{H2SO4},\quad \ce{BaCl2},\quad \ce{Na2SO4},\quad \ce{Na2CO3} \]
- Using only one reagent, identify the following substances:
\[ \ce{HCl},\quad \ce{NH4Cl},\quad \ce{Na2SO4},\quad \ce{(NH4)2SO4} \]
A.10 Optional Experiment: Measuring Avogadro’s Constant
Purpose
- Clearly understand the significance of Avogadro’s constant.
- Learn the principle and technique of the monolayer method for measuring Avogadro’s constant.
Materials
Analytical balance (\(0.001\ \text{g}\)), beaker (\(50\ \text{mL}\)), glass rod, volumetric flask (\(250\ \text{mL}\)), rubber-tipped dropper, graduated cylinder (\(10\ \text{mL}\)), circular water trough (diameter \(30\ \text{cm}\)), ruler.
Stearic acid (\(\ce{C17H35COOH}\), analytical grade), benzene (\(\ce{C6H6}\), analytical grade), anhydrous calcium chloride.
Procedure
Prepare the stearic acid–benzene solution. The instructor prepares this before class: accurately weigh \(90\)–\(100\ \text{mg}\) of stearic acid8 in a small beaker, dissolve in a small amount of benzene (to \(300\ \text{mL}\) of benzene add \(5\ \text{g}\) of anhydrous calcium chloride, shake thoroughly, and filter to remove trace water). Transfer to a \(250\ \text{mL}\) volumetric flask. Rinse the beaker several times with benzene and transfer all rinse solution to the flask. Add benzene to the calibration mark and shake well. This solution is provided for student use.
Determine the volume of each drop. Using a rubber-tipped dropper with a finely drawn tip, draw up the stearic acid–benzene solution and count the number of drops needed to deliver \(1\ \text{mL}\) into a small graduated cylinder. Calculate the volume per drop, \(v\).
Measure the surface area of the water in the trough. Using a ruler, measure the inner diameter of the water trough from three different orientations and take the average.
Form a stearic acid monolayer. Using the rubber-tipped dropper (if there is solution on the outside, wipe it off with filter paper), draw up the stearic acid solution and, from approximately \(5\ \text{cm}\) above the water surface, drop one drop vertically onto the water. Wait until the benzene has completely evaporated and the stearic acid has spread until no droplets are visible, then add the second drop. Continue adding drops one at a time until, after a drop is added, the stearic acid solution no longer spreads and instead remains as a lens-shaped droplet. Record the number of drops, \(d\).

Pour out the water, clean the trough thoroughly, refill with water to half the trough, and repeat the above procedure two more times. When repeating, first squeeze out any remaining solution in the dropper and draw up fresh solution to avoid concentration changes due to benzene evaporation at the dropper tip. Take the average of the three trials.
Calculation.
If the mass of stearic acid weighed is \(m\) (g) and the total volume of solution prepared is \(V\) (mL), then each milliliter of solution contains \(\frac{m}{V}\ \text{g}\) of stearic acid.
If the volume per drop is \(v\) (mL) and the number of drops to form a monolayer is \(d - 1\),9 then the mass of stearic acid in the monolayer is:
\[ v(d-1) \cdot \frac{m}{V} = \frac{vm(d-1)}{V} \]
From the trough diameter, calculate the water surface area \(S\) (\(\text{cm}^2\)). Given that the cross-sectional area of each stearic acid molecule is \(A = 2.2 \times 10^{-15}\ \text{cm}^2\), the number of stearic acid molecules in the monolayer is \(\frac{S}{A}\).
From results (2) and (3), the mass of each stearic acid molecule (g) is:
\[ \frac{\dfrac{vm(d-1)}{V}}{\dfrac{S}{A}} = \frac{Amv(d-1)}{SV} \]
- The molar mass of stearic acid is \(M = 284\ \text{g/mol}\), so the number of molecules per mole — i.e., Avogadro’s constant \(N\) — is:
\[ N = \frac{M}{\dfrac{Amv(d-1)}{SV}} = \frac{MSV}{Amv(d-1)} \]
Discussion
What measures could be taken to reduce the error in this experiment?
Translator’s note: The original text contains a typographical error: 苯取 (literally “benzene extraction”) should read 萃取 (extraction). This is a common OCR/typesetting error.↩︎
Translator’s note: The original text uses “M” (molar) as the unit of concentration. In modern IUPAC notation, this is written as \(1\ \text{mol/L}\).↩︎
Translator’s note: This step demonstrates that extraction with \(\ce{CCl4}\) effectively removes dissolved \(\ce{I2}\) from the aqueous phase, as shown by a diminished starch–iodine color reaction.↩︎
Translator’s note: The zinc reduces \(\ce{Br2}\) to \(\ce{Br-}\) ions. Adding \(\ce{Cl2}\) re-oxidizes \(\ce{Br-}\) back to \(\ce{Br2}\) (orange color returns); adding \(\ce{AgNO3}\) produces a pale yellow \(\ce{AgBr}\) precipitate, confirming the presence of bromide ions.↩︎
Translator’s note: The key to problem (2) is that mixing all possible pairs reveals distinctive reactions: \(\ce{AgNO3}\) produces precipitates with \(\ce{NaBr}\), \(\ce{HCl}\), and \(\ce{Na2CO3}\); \(\ce{Na2CO3}\) produces gas with \(\ce{HCl}\); etc.↩︎
Translator’s note: Plant ash (草木灰) is the ash remaining after burning plant material. It is rich in potassium carbonate (\(\ce{K2CO3}\)) and has been used since antiquity as a source of potash.↩︎
Translator’s note: If a platinum wire is unavailable, a clean, rust-free iron wire may be used. The wire must first be cleaned by dipping it in concentrated hydrochloric acid and heating until the flame shows no color, to remove any contaminants.↩︎
Translator’s note: Stearic acid (\(\ce{C17H35COOH}\), molar mass \(284\ \text{g/mol}\)) is a long-chain fatty acid. When dropped on a water surface, stearic acid molecules orient themselves vertically with the hydrophilic carboxyl group in the water and the hydrophobic hydrocarbon chain pointing up, forming a monolayer exactly one molecule thick.↩︎
Translator’s note: The last drop — the one that no longer spreads — is not counted, since it indicates the monolayer is already complete. Hence \(d - 1\) drops contribute to the monolayer.↩︎